

plant & harvest activities guide
Incorporating games and activities into your class or workshop is a great way to vary learning formats and encourage people to talk in a more relaxed way.
When incorporated with contextual educational materials, these activities encourage a closer, informal community bond within your group, as well as learning together at the same time.
We suggest you consider incorporating one of our activity suggestions below, or devise your own activity with contextual learning that is suitable for your group.
Suggestion 1: the peach stone game
The Peace Stone Game is traditionally played as a part of The Seed Dance Ceremony by the Oneida Nation before seeds are planted in the spring, and at other celebratory times (such as mid-summer) to reaffirm gratitude and reciprocity.
The Peach Stone Game is also a part of the Oneida Creation Story. In the Oneida Creation story twin brothers, the left-handed brother and the right-handed brother, fight over who will be the Creator of everything on Turtle Island (North America). They try several different ways of settling the decision, including The Peace Stone
Before you play the game consider:
-
Reading and discuss the Oneida Creation Story together
-
Watching at least the first part of this video to learn more about the agricultural history of the Onida Nation, which included large peach orchards in their original homelands (now called New York): INDIGENOUS AGRICULTURE - Traditional Agricultural Practices of the Oneida Nation (REYNALDO A MORALES Educational Environmental Media, 2013) https://www.youtube.com/watch?v=ww2wqC1xHzU
-
Discuss at least one of these topics as a group:
-
Read the Food Sovereignty section of these materials, and use the Recipe Discussion Prompts or the Food Sovereignty Discussion Prompts to lead a conversation with your group.
-
In the traditional Oneidan version of The Peach Stone Game (outlined below), red objects and shiny objects are specifically not allowed as betting offerings in the game, because red can symbolize luck and shiny things can symbolize greed. What are some objects, colors or traditions in your own family histories that hold particular significance, and why?
-
-
There are two teams: Turtle & Bear clans vs Wolf clan.
-
There is also 1 referee.
-
Each player is given 6 dried beans (which represent 6 chances to plan & win).
-
Each player places something of value in a pot to gamble with. This item must not be red, shiny, or anything you want to throw away.
-
6 peach stones (peach pits) are placed in a wooden, flat bottomed bowl. The pits should be painted black on one side.
-
Place the bowl between the teams, with the referee nearby.
-
Place two white handkerchiefs, one either side of the bowl. Decide which side represents which team.
-
Two players from opposing teams take turns to shake the bowl, as if shaking dice, then bang the flat bottom on the table or floor to make the peach stones jump. A winner ends up with 6 peach stones the same color. Each turn costs the player 1 bean. If you win, you knock your opponent out. If neither win, players continue to take turns until you’re out of beans.
-
If your opponent wins, all the spent beans go under their team's handkerchief.
-
The winning team is the first team to win all of the beans. They also win the bowl of valued items.
The traditional oneida way to play:
Our suggestion for your group game:
What you will need:
-
A whiteboard or blackboard with an eraser would be ideal for score-keeping, but paper & pen will also work.
-
6 large dried lima beans, marked on one side with a sharpie or paint. Extra beans in case any break.
-
A flat bottomed bowl, preferably wooden. A wooden bowl will also be quieter.
-
1 designated referee.
-
1 designated score keeper.
-
A towel or pillow to place under the bowl to reduce noise.
-
1 dice.
How to play:
-
Designate 1 referee and 1 score keeper.
-
Split the rest of your group in half to form two teams, and have each team decide upon a team name together. If the teams are unevenly numbered, decide which player in the smaller team will go twice to even out the numbers.
-
The designated scorer divides the whiteboard into 3 columns; one column for each team, and a “stash” column.
-
Place the beans in the bowl, put the bowl on top of the pillow (or towel), and place it on a table between the two teams.
-
Have the teams form a line.
-
The first members of each team sit or stand opposite each other. Each rolls the dice. The highest number is the starter, and goes first.
-
The starter shakes the bowl of beans as if shaking dice, then bangs the bowl on the pillow to make the beans jump. The goal is to end up with all white-sides up, or all marked-sides up. If this happens, the winning team gets 1 point in their column, and the opposing player is out. Play moves to the second player in the losing team and stays with the winning player from the winning team. If the beans land with a mixture of white-side up and marked-side up, the player loses, and 1 point is added to the “stash” column. The bowl is then passed to the opponent, who repeats the game. If neither player “wins,” each player has six tries, before passing to the next player.
-
Each time a player wins, all of the “stash” points get moved to their teams column.
-
When all of the players have played, the winning team is the team with the most points.
Suggestion 2: Plant or seed exchange
Reciprocity is a founding principle in Native American culture, including the exchange of plants. This includes only taking what you need from the land, giving back to the land afterwards (often with an offering like tobacco or sage), and a barter and trade system of exchange for food that doesn't use money. You may not be exchanging Indigenous plants or seeds, but holding a small plant or seed exchange in your group will help to build community in a fun way, and creates good opportunities for people to learn about each other's lives.
Before you plant or seed exchange, consider:
-
Watching: Kanenon:we - Original Seeds (PBS, 2025) https://www.pbs.org/show/kanenonwe-original-seeds/
-
Indigenous Seed Exchange Etiquette (Ukwakhwa, 2021)
https://www.youtube.com/@Ukwakhwa/search?query=exchange
-
Discussing: What does reciprocity mean to you? What are some examples of reciprocity in your own life? How have these feelings and experiences shaped who you are?
-
This kind of system, where goods and services are exchanged without money, or even immediate expectation of other gains, is also known as ‘a gift economy.’ Think about your life, and the place (country, city, own) that you live in. What are some other examples of gift economies around you?
Exchange Guidelines:
Plants & Seeds
-
Everyone must bring at least one plant, plant cutting or seed packet to exchange.
-
Bring only healthy plants, cutting and seeds. No pests or mold.
-
If you are bringing seeds you have harvested yourself, or been given, they should be placed in a sealed paper enveloped and clearly labeled with Name (your name), Species (e.g., Tomato), Variety (e.g., Purple Cherokee), Date collected (e.g., summer 2025), and Place Harvested (e.g., farm / garden / park etc, city, state). If you are gathering seeds from anywhere that isn’t your own garden you MUST seek permission first (e.g., County Grounds Park, Milwaukee, with permission from NAME, Milwaukee County Parks).
Rules of Exchange
-
Exchanges are not monetary.
-
Exchanges should be equal.
-
Exchanges include care or planting instructions.
-
You are responsible for cleaning up after / taking home anything you do not exchange.
Other Considerations
-
Bring spare pots, soil, labels and markers so people can take cuttings or split seed packets if they like.
-
Bring cleaning supplies and leave the space as clean as you found it.
-
Depending on the time of year, your local greenhouse may have surplus seeds or plant starts (seedlings) to donate to your group.
-
You might also consider asking someone from your local greenhouse to come to share tips with your group.
Suggestion 3: food sovereignty & potluck
Sharing food is a wonderful way to bring people together over conversation and commonalities. Consider having participants bring in a cultural or ancestral food, a food from their family history, or a food that is important to them. They can share why they brought what they did, and participants can get a taste of what types of food are important to others in their community and why.
What is Food Sovereignty?
Food sovereignty is a people’s right to self-determination over their own food and agriculture systems, meaning that they are free to choose how those systems work. Food sovereignty puts the needs of the local community who grows, distributes, and eats the food above the needs of large corporations.
Food sovereignty also means that people have a right to healthy and culturally appropriate food that is grown sustainably. Indigenous communities are especially affected by this, as much of their traditional diet has been replaced by new, highly processed foods that are known to cause health problems such as obesity, diabetes, and heart disease at high rates in Indigenous people. Returning to a traditional diet has been shown to help with these problems.
To Indigenous people, food is a gift from the creator, and the plants and animals that are their food are also their relatives. Giving back to these relatives and to the land is known as reciprocity, and is an important part of Indigenous culture. This helps make sure the earth stays healthy for future generations, which is why Indigenous food sovereignty is so important: not just for people’s present health and culture, but also for the future health of the environment and generations to come.
“Every time an Indigenous person plants a seed, it is an act of resistance, an assertion of sovereignty, and a reclamation of identity.” -Becky Webster (Ukwakhwa)
Suggested listening: The Rematriation of Seeds, The Native Seed Pod podcast, Becky Webster https://www.nativeseedpod.org/podcast/2021/ep16-rebecca-webster
Consider beginning this activity by:
-
Watching: Planting and Caring for Beans (Ukwakhwa, 2021) https://www.youtube.com/watch?v=UTMXYshoLFM
-
Watching: Seed Saving Indigenous Beans (Ukwakhwa, 2022) https://www.youtube.com/watch?v=ypbY7N_SyLw
-
Considering:
While watching these videos, ask your group to consider planting beans. Make notes using these prompts:
-
What kind of food would you like to grow & why?
-
Why is good record keeping important for seeds?
-
What does Ukwakhwa believe are the three most important purposes of the bean?
-
What does food sovereignty mean to you? If it’s your first time learning about food sovereignty, what do you think it means?
-
Why do you think food sovereignty is important?
-
What do you think are some of the main differences between food systems that are sovereign and food systems that are not?
-
Can you think of any issues with our current food system that food sovereignty could help solve?
-
What are some ways we can work toward food sovereignty? What kind of work are people already doing?
-
In the Planting and Caring for Beans video, they talk about the “Three Sisters” method of planting. This is a method for growing corn, beans, and squash together. Learn more about the amazing nutritional benefits of eating The Three Sisters together, and discuss: How is this food sovereignty? The Interworking of the Three Sisters, Oneida Nation https://www.oneidaindiannation.com/the-interworking-of-the-three-sisters/
-
Note: Consider modifying discussion questions based on age group. Older students may be capable of having deeper discussions about food sovereignty than younger students, but that doesn’t mean the discussion can’t still be valuable at all ages.
Food sovereignty discussion:
A conversation while sharing a harvest:
-
Have your participants share what they each brought for the potluck, and why they brought it.
If you are a larger group, consider splitting into smaller groups for this next part.
-
Use the Recipe Discussion Prompts (See "Recipes" sub-section of the "White Corn" section of this page) or the Food Sovereignty Discussion Prompts (See "Food Sovereignty Discussion Prompts" section on the Home page) in your group to share personal memories and your own stories of food sovereignty while you enjoy the potluck.
Suggestion 4: making corn husk dolls
In a variety of cultures, corn husks have been used to create dolls. In the Haudenosaunee Confederacy, corn husk dolls are made without faces.Stories of why this came to be vary slightly, but the lesson remains the same. As one traditional story goes, the Corn Spirit was one of the Three Sisters, along with Beans and Squash. These sisters were also known as the sustainers of life, and the Corn Spirit was so honored to be one of these sustainers of life that she wanted to do more for her people. The Great Spirit told her that dolls could be made from her husk, so the Corn Spirit made this doll and gave it a beautiful face. The doll then went to many villages to play with the children there. As she travelled, people kept telling her how beautiful she was, to the point where she became conceited and vain. After warning her, the Great Spirit punished her repeated offense by removing her face, which she had been admiring in a pool of water. Since then, corn husk dolls have always been made without faces, to remind people never to think they are better than anyone else.
Instructions

Depending on the time of year, you could use real corn husks or cut paper corn husks as part of this activity.
Visit the White Corn materials to learn more about corn.
Suggestion 5: plant search field visit
A plant search field visit is a great way for students to connect with native plants. Find a natural area near you by checking out the Plant Search Field Visit Suggestions. During the visit, have students try to find and identify native plants. PlantNet is a good app to use if your students have phones and need assistance with identification, although it should be noted that it isn’t 100% accurate. It may also be a good idea to combine this field visit with the nature journaling activity, found under “Additional Activities.”
additional activities guide
Suggestion 1: Nature journaling
Nature journaling is a great way to relax, observe, and reconnect with nature. For this activity, all you’ll need is a pen and paper to write and/or draw. Find a comfortable spot outside where you can sit and journal; this could be a bench in a park, a log in the woods, or in the grass of a prairie–wherever you have access to that is suitable.
Remember: there’s no right or wrong way to do a nature journal. You can do a free write, doodle or sketch illustrations, write poetry, or jot down whatever thoughts pop into your head.
While you can always just write or draw whatever feels right, some people may want some help getting started or simply like a little more direction. If that’s the case, here are some prompts to guide you:
Prompt 1: Noticing
For this prompt, simply record what you notice about your environment. What can you see, hear, smell, touch, or taste? What are some small things you notice now that you might have missed if you were just passing by? Try to be descriptive and paint a picture of your surroundings–don’t just try to record as many things as possible. Take your time and be present in the moment.
Prompt 2: Feeling
This prompt requires you to be aware of your body in its surroundings. How does being outside in this environment make you feel? How is it different from walking along the sidewalk in a city or sitting outside in your yard? How is it different from being inside? Do you feel a particular connection to this environment or anything in it? Is the wind blowing on your face or is it a calm day? How does the grass, log, bench, or rock that you’re sitting on feel? Is the air crisp or heavy and humid? Be aware of these sensations and write about them.
prompt 3: wondering
After you’ve sat and observed for a while, record some questions that have come up. Maybe you noticed a critter exhibiting a strange behavior and are wondering what they were up to. Or maybe you noticed a strange pattern on a tree, or a deformity on a plant. What could these things mean? We often take for granted or simply don’t think much about the complexity of life that goes on in our environments. Take a moment to consider the lives being led around you. If you could have a conversation with one of the creatures you see, what would you ask them?
Prompt 4: Connections
Oftentimes patterns, habits, and cycles in nature can mirror human ones–after all, we are also part of nature. Is there anything in your life that you connect to your environment? Perhaps there is something that evokes a certain memory or emotion, or maybe reminds you of someone else in your life. Do you see any parallels between human interactions and the interactions you’ve observed in your environment? Is there anything you think we can learn from nature? What might you have in common with a squirrel, a tree, or a mushroom?
Prompt 5: Drawing
For this exercise, choose something nearby and draw its contour line, or outline, without looking down at your paper. This is called a blind contour. By keeping your eyes focused on the subject, it allows you to give it your full attention while your hand draws intuitively. Don't expect the outcome to look perfect–in this case, it’s the process that counts.
Suggestion 2: weaving workshop
After learning about black ash basket weaving, have your students try one of these fun and simple paper weaving activities. These activities are great for elementary-school age students. The materials you will need are listed below:
-
Construction paper (preferably in a variety of colors)
-
Scissors
-
Pencils
-
Rulers
-
Tape, glue, or stapler
How to Make a Woven Paper Bag - Laughing Kids Learn
How to Weave a Paper Basket - WikiHow


Suggestion 3: Zine Activity
A zine is a homemade publication that can be created on an 8.5 x 11 sheet of paper, copied, and distributed. Zines are an accessible way of communicating information, and making zines can be a fun and educational classroom activity or community workshop.
What you will need:
-
8.5 x 11 paper
-
Scissors or an exacto knife
-
Drawing & coloring materials OR an editing application like Photoshop, InDesign, or Procreate if working digitally
Directions:
Have students/participants choose a plant they want to research, or assign each individual a plant. Preferably this would be a native plant, but allow flexibility and take into account people's interests. Have everyone fold their zine by following these instructions: How to Make a Zine - Wikihow. You can also print out some of the example zines included in this packet so participants can practice folding and cutting.
Next, set some time for your students/participants to research their plant and create their zine, depending on how much time you have available. If you are running a workshop, you could assign plants to participants in advance, and have them bring their research with them. Providing zine making materials for a group session can be cost effective and fun.
Participants can work directly on paper, in which case they should include drawings as visual aids. If they have access, participants can also choose to work digitally in Photoshop or a similar application, in which case they should include Creative Commons images as visual aids instead. In either case, it’s a good idea to leave a ¼ inch margin around your design to accommodate for printing. Suggestions of what to include in the zine are listed below. This list is not comprehensive. Participants should feel free to include things that are not on this list or leave things out depending on what information is most important to know about their plant. They will likely not be able to fit all of this information in their zine anyways, so they should be selective and intentional with what they decide to include. However, certain basic things, like plant names and images, should be included.
When everyone is finished with their zines, have the people working on paper scan and upload their zines so they are able to print copies. Have the people working digitally print a physical copy to show the group.
things to include in your zine:
-
Plant name
-
Scientific name
-
Common names
-
-
Taxonomic classifications like family, genus, etc.
-
Common look-alikes & how to tell them apart
-
Identification characteristics
-
Leaves
-
Flowers
-
Fruit/seeds
-
Bark
-
Roots
-
Habit (AKA the way a plant tends to grow)
-
Other characteristics such as smell, range, habitat, etc.
-
-
Uses/traits
-
Medicinal
-
Edible
-
Toxicity
-
Other uses/traits such as weaving, insulating, impact on environment, etc.
-
-
Conservation/invasive status
-
Fun facts
-
Images/drawings
Examples:


Encourage people to be creative and go beyond what is shown in these examples. For instance, including elements of collage would be a great way to level-up a zine! You can also use the inside of your zine if you want to unfold it for more space.
Note: While this activity is suitable for all ages, it may need to be adjusted slightly for younger children. Feel free to simplify it however you deem necessary, such as encouraging them to include more images, fun facts, or even questions for the reader.
For more information on teaching with zines, making zines, or for more examples, check out this resource: Teaching with Zines
Suggestion 4: story card Activity
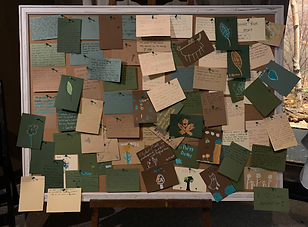
A Story Card Activity encourages people to share short personal stories, words, or drawings on a particular topic. The cards are pinned up all together creating a community of stories. The variety of voices and perspectives is always surprising!
A Story Card Activity is a great way to engage strangers at a public event, but it’s also a good way to share together in a smaller group.
What you will need:
-
A large bulletin board is ideal, but a wall, table or even the floor can also work.
-
A stack of postcards, sticky notes or paper.
-
Pens
-
Pins or tape.
-
Prompts.
Feel free to use the prompts below, or make your own:
Write or draw…
-
What is your favourite native plant and why?
-
Share a memory about a time when plants played an important role in building community.
-
Do you have any favorite plant recipes you’d like to share?
-
Freeform option: write down any idea, information, thought, memory, or story about a plant that you feel the need to pass on.
Sharing the story
Encourage participants in your group to:
-
Pick cards out (not their own), and read them out or share what they see
-
Share why they picked this particular card
-
How does this story resonate, or how is it different, from their own experience?
-
What more would they like to know?
Story Card Activity, 3 Rivers Powwow, Milwaukee Public Museum, Nov. 1, 2025


Suggestion 5: coloring sheets and worksheets
Our coloring sheets and worksheets are great for younger kids, although we have some that are suitable for all ages. Find them under the Coloring Sheets & Worksheets section.
Harvest Basket coloring sheet printable: Harvest Basket Coloring Sheet
Basic Plant ID coloring/worksheet printable: Basic Plant ID Coloring/Worksheet
Basic Corn ID coloring/worksheet printable: Corn ID Coloring/Worksheet
Ash ID Coloring/Worksheet printable: Ash ID Coloring/Worksheet
Tobacco coloring sheet printable: Tobacco Coloring Sheet
Cedar coloring sheet printable: Cedar Coloring Sheet
Sage coloring sheet printable: Sage Coloring Sheet
Sweetgrass coloring sheet printable: Sweetgrass Coloring Sheet


plant search field visit suggestions
Wisconsin by COunty

Please scroll to access the entire table!
Zines
Black Ash Zine printable - Digital
Black Ash Zine printable - Physical


